Holiday Cheer InKing Royalty Blog Hop

Standard


Holiday Cheer

Welcome to InKing Royalty’s December Blog Hop!  Today’s hop is filled with inspiring projects that share lots of Holiday Cheer.  We are excited to share our projects and hope you’ll find great inspiration from our talented team members in this hop.  After you read my post, I  hope you’ll hop over to the next person on the list at the base of this post.

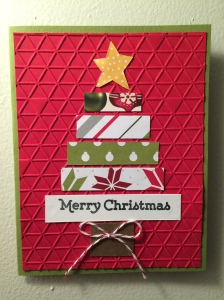
Wow!  How can it almost be Christmas already!  I think this is the most wonderful time of the year–and it is also one of the busiest times for everyone!  It is CRAZY busy at the hospital where I work–with that, and getting ready for the holidays, I feel like I am meeting myself coming and going!  Luckily, I have stamping and crafting to help me relax!  When I was trying to decide what to make for this blog hop, I knew I wanted something fairly simple, but still awesome!  I saw a picture of a quilt with this Christmas tree design on it, and decided it would be perfect to showcase some of our DSP!

039


I ran into a little problem with the star–I had nothing that was the right size, and I really wanted it to be “country”, so I hand cut one.  I was flipping through all of my DSP, and I was really glad to find one for the star in the Cherry On Top stack.  I was also happy that the sentiment fit perfectly in the bottom strip.  I finished it off with a little bow.  I love how it turned out!

Stamps:  Versatile Christmas

Paper:  Real Red, Old Olive, Soft Suede, Cherry on Top DSP, Merry Moments DSP, Home for Christmas DSP

Misc.:  Tiny Triangles Embossing Folder, Cherry Cobbler Bakers Twine

Thank you for stopping by today.  I hope you’ll hop along to the next stop on the blog hop,

  1. Lisa Pretto at InkBig Academy Stamps

. There’s lots of inspiration to be found in this group – and you don’t want to miss it!

Thank you for hopping along with us. If you get stuck during the Blog Hop, please use this line-up as a guide:

  1. Brian King at Stamp with Brian
  2. Shawn de Oliveira at ShawnStamps
  3. Denise Hoepfner at The Mountain Magpie
  4. Becky Volpp & Megan Quillen at Ink Blossom with Becky
  5. Deb Cozzone at Grand Central Stamping
  6. Sharon Walker at Stamp with Sharon W
  7. Lisa Pretto at InkBig Academy Stamps
  8. Julie DiMatteo at The Paper Pixie
  9. Candy Ford at StampCandy
  10. Lynn Kolcun at Avery’s Owler

{{{hugs}}}  and Merry Christmas!!!

Sharon

So Grateful InKing Royalty Blog Hop

Standard
                                                  So Grateful

Welcome to InKing Royalty’s November Blog Hop!  Today’s hop is filled with inspiring projects that share the gratefulness of the season.  Whether you are ready to celebrate Thanksgiving this week or just feel reflective of the things that make you thankful, we are sure you’ll find great inspiration from our talented team members.  After you read my post, I  hope you’ll hop over to the next person on the list at the base of this post.

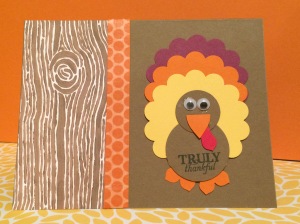
I love Thanksgiving!  The warm colors, the cute turkey and Pilgrim decorations, and the wonderful scents!  There’s just something about smelling turkey and pumpkin pie baking–yum, yum!  I also love punch art, and what better way to say Happy Thanksgiving than with a sweet little punch art turkey!

                                                  151

I toyed around with several different sentiments, and was delighted when I found that the stamp from the Wickedly Sweet Paper Pumpkin set fit perfectly on the belly of the turkey!  I wanted to use the washi tape on this card, too, but was disappointed at first because it is so thin I could see the line between the DSP and the cardstock base.  I solved that problem by cutting a half inch strip of pumpkin pie paper and adhering the tape to it.  I used several different punches (I am a punch-a-holic, lol!) including making the beak out of a petal snipped off of one end of part of the Festive Flower Builder punch, and using one of the petals from the Petite Petals punch to make the wattle(I used the Petite Petals punch for the feet, too).   Easy and fun to assemble!

Paper:  Soft Suede, Pumpkin Pie, Rich Razzleberry, Daffodil Delight, Into the Woods DSP

Stamps:  from Wickedly Sweet Paper Pumpkin kit

Ink:  Memento Black

Punches:  Festive Flower Builder, Petite Petals, 2 3/8″ scallop circle, 1 3/8″ circle, 1″ circle

Misc.:  ’14-’16 In Color Designer Washi Tape, googly eyes


Thank you for stopping by today.  I hope you’ll hop along to the next stop on the blog hop, Brian King at Stamp with Brian. There’s lots of inspiration to be found in this group – and you don’t want to miss it!

{{{hugs}}}

Sharon

Inking Royalty Blog Hop-Tricks or Treats

Standard

Tricks%20or%20Treats%20(1)

Welcome to InKing Royalty’s September Blog Hop.  We are helping to prepare you for October with super-fun Tricks OR Treats.  Our projects center around fun techniques (tricks) or creative ways to package up Halloween goodies (treats).  In some cases, you might get BOTH!  What fun!  After you read my post, I  hope you’ll hop over to the next person on the list at the base of this post.  

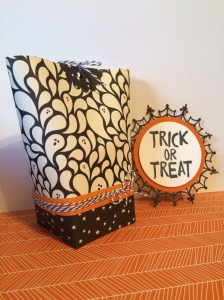
I love Halloween and I love treats!!  StampinUp! has done a phenomenal job with the Halloween stamp sets, DSP and embellishments this year and I have had so much fun playing with them.  For this project, I decided to use the “Box in a Bag”.  I found a great tutorial with a video on Splitcoaststampers ( http://www.splitcoaststampers.com/resources/tutorials/boxinabag/), and once I decided on the papers I wanted to use, the construction of the box was a snap!  It looks like it takes a long time, so you can really impress your recipient!  Of course I had to use one of the awesome spider web doilies, too!  The sentiment and doily are popped up with dimentionals, and the bag is tied shut with bakers twine.  I like the size of this bag-I followed the directions from the tutorial, so it is 5 1/2 inches high and it has plenty of room for candy or home made treats.  If you want a smaller bag, all you have to do is cut the DSP down to the size you want.  I love that versatility!

038

039

Stamps:  Howl-o-ween

Ink:  Memento Black

Paper:  Tangelo Twist, Whisper White, Happy Haunting DSP

Misc:   Basic Black Baker’s Twine, Spider Web doily, Circle Framelits, Scallop Circle punch

Thank you for stopping by today.  I hope you’ll hop along to the next stop on the blog hop, Jennifer Spiller at Westside Paper Creations.  There’s lots of inspiration to be found in this group – and you don’t want to miss it!

{{{hugs}}}

Sharon

Thank you for hopping along with us. If you get stuck during the Blog Hop, please use this line-up as a guide:

  1. Brian King at Stamp with Brian
  2. Candy Ford at StampCandy
  3. Lynn Kolcun at Avery’s Owlery
  4. Lydia Fiedler at Understand Blue
  5. Shawn de Oliveira at ShawnStamps
  6. Lisa Pretto at InkBig Academy Stamps
  7. Sharon Walker at Stamp with Sharon W
  8. Jennifer Spiller at Westside Paper Creations
  9. Becky Volpp at Ink Blossom with Becky


Global Design Project 001

Standard

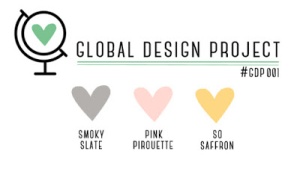
My upline, Brian King, is part of a design team that has started a new challenge, and I decided to play along!  The challenge was to use three colors: pink pirouette, smoky slate and so saffron.  I was all ready to get started when I realized that I didn’t have any smoky slate paper, and I never got around to ordering the smoky slate ink pad–oops!  I was beginning to panic until I remembered that a past My PaperPumpkin kit had used Smoky Slate, so I started rooting through my stack of orange boxes, and thankfully found the inkspot and an unused card base.  Whew!

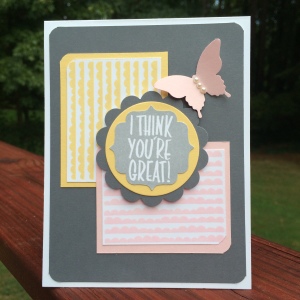
Now–this is not a color combination that I would have thought of on my own, and I had to play around with the layout a little bit, but I admit that I am really happy with the end result!  For the sentiment, I know it looks a little washed out–the ink spot was probably a bit dry, but it does add some extra contrast!  I had the label bracket punch laying on my desk from another project, and I just happened to try it out-and it fit!  I like the different look.  I did pop the sentiment up with dimentionals.  The pink butterfly helps fill in the big blank area in the upper right of the card–you could also use a flower, but I’m on a butterfly kick these days!  A few pearls for some bling, and I think it is perfect!

018

Stamps:  I Think You’re Great

Ink:  Smoky Slate

Paper:  Smoky Slate, So Saffron, Pink Pirouette, Whisper White

Misc:  Label Bracket Punch, Elegant Butterfly Punch, Circle framelits, 2 3/8″ scallop circle punch, corner rounder punch, pearls, dimentionals

Go check out the challenge here:

GDP001_Colour_Challenge

http://www.global-design-project.com/2015/09/global-design-project-gdp001.html

and play along!

{{{hugs}}}

Sharon

Get Well Soup

Standard

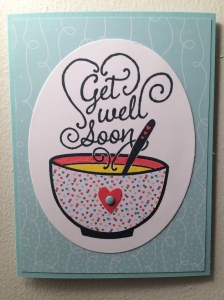
Today I decided to pull out my Get Well Soup stamp, put it together, and actually USE it!  I have an awful lot of stamp sets that I have not even opened yet–it’s a little embarrassing to admit that to the blog world–but I decided that if I actually shared it with you all, it might make me do something about it!  This is a really cute stamp, and it’s a nice size–it’ll fill up your card so you don’t have to add much more to finish it off.

I haven’t done paper piercing in a long time, so I decided to use that for the bowl.  I don’t have a big selection of current paper (let’s not talk about my massive hoard of retired papers–) but when I was flipping through the Cherry on Top DSP stack, and saw the paper with the swirls on it that mimicked the steam coming off the bowl of soup, I knew I had to use that as my background!  The other paper with the tiny colorful hearts was perfect for the bowl.  The hardest part of this card was cutting out the heart that goes in the center of the bowl–AND, if you look closely, it appears that I used paper that had a design on it, but that was just from my chewed up cutting pads when I passed it through the Big Shot!  I thought about redoing the heart, but I decided I kind of liked it!

I colored the inside of the bowl, the soup, and the hearts on the handle of the spoon with markers, and then finished it off with a candy dot in the middle of the heart on the bowl.

003

Stamps: Get Well Soup

Paper:  Cherry on Top DSP, Pool Party, Whisper White

Ink:  Memento black, Watermelon Wonder marker, Daffodil Delight marker

Misc:  Oval Framelits, Subtles Candy Dots

{{{hugs}}}

Sharon

“Can You Case It” Challenge #84

Standard

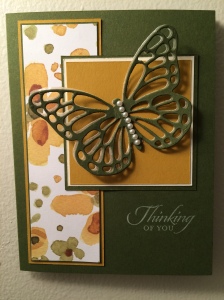
I had to make the card that you never want to have to make tonight.  It was for a friend who lost her 23 year old son to an overdose.  Such a sad, sad situation.  I have been thinking of her and the family constantly since I heard, so I knew that I wanted to use a “Thinking of You” sentiment, and butterflies just seemed appropriate.  I chose yellow and green because I love that color combination, and it just seemed soothing to me.

When I saw the CYCI layout, I knew it would work perfectly for my card, so I got to work.  I tell you guys, I am really late to the party using all these challenges, and I really regret all the time I used to spend agonizing over creating a card!  I am starting to enjoy working with my hoard now!

I chose to layer the wax paper cut out of the butterfly underneath the mossy meadow cut out to create a little more depth.  I used my new favorite fine tip glue pen to adhere them together–I LOVE that thing!  A line of mini pearls and the sentiment stamped in white, and the card was done in less than an hour.  Amazing!  Here it is:

017

Stamps:  Wetlands

Ink:  Craft White

Paper:  English Garden DSP, Mossy Meadow, Hello Honey, Very Vanilla

Misc: Butterfly thinlits, Pearls

Ya’ll, hug those that you love extra tight tonight, tell them you love them, and DON’T DO DRUGS!

{{{hugs}}}

Sharon


Bundled Up for the Holidays InKing Royalty Blog Hop

Standard

Bundled up for the Holidays Blog Hop Banner (1)

Welcome to InKing Royalty’s August Blog Hop.  Stampin’ Up!’s 2015 Holiday Catalog is just around the corner (it’s live on September 1) – and this amazing book is filled to the brim with incredible bundles at discounted prices.  Who doesn’t love to save with bundles?!?  Today we are Bundled Up for the Holidays as we celebrate these amazing stamp set bundles from the Holiday Catalog.   After you read my post, I  hope you’ll hop over to the next person on the list at the base of this post.

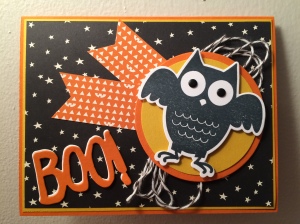
I think this has to be the best holiday catalog ever!  I know that I pretty much want everything in it, and I had a hard time limiting myself on my first order!  The first bundle I had to play with was the adorable Howl-o-Ween Treat stamp set and the matching Boo to You framelits.

012

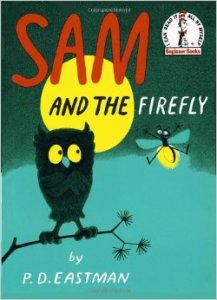
That cute bat (or is it an owl?) just makes me smile!  As a matter of fact, as I was creating this card, I was reminded of a book I read growing up–“Sam and the Firefly” by P.D. Eastman.  I was a little tempted to color his eyes yellow, haha!  I resisted, though, and used black candy dots instead to make his eyes stand out.  I also popped him up with dimentionals.

51E18cm72vL._SY344_BO1,204,203,200_

I used the Happy Haunting DSP to choose my colors, and way back in the olden days, before I met Brian (King), I would have been happy with just one layer on my card, but he has pulled me over to the dark side, and now I have to layer everything!  It really does make a difference!  Did you notice the whisper white layer under the sentiment?  Yeah, I saw that on one of Brian’s cards, too.  I tried every which way I could think of to get one of the spider web doilies on this card (I LOVE them!), but it just didn’t look right, so I had to settle for some bakers twine.  This was such a fun card to make, and I can’t wait to see what everyone else has created!

Thank you for stopping by today.  I hope you’ll hop along to the next stop on the blog hop. There’s lots of inspiration to be found in this group – and you don’t want to miss it!

{{{hugs}}}

Sharon

InKing Royalty Blog Hop Lineup
Thank you for stopping by! Please hop over to the next person in the list for more inspiration and exciting bundles from the Holiday Catalog:
1. BRIAN KING
2. AMY WHELAN
3. CANDY FORD
4. JENNIFER SPILLER
5. PAM MORRIS
6. MARY FISH
7. SHAWN DE OLIVEIRA
8. DENISE HOEPFNER
9. LISA PRETTO
10. LYNN KOLCUN
11. SHARON WALKER
12. BECKY VOLPP
13. DEB COZZONE

PP259, Howl o ween Treet

Standard

Hello again, Blog world!  It is the start of my favorite time of year–fall!  I’m still waiting for cooler weather, but I am already playing with some of the new fall products from Stampin’ Up!  This year there are some really cute Halloween stamp sets to choose from, and I just had to use two of them for this card!

I started with this Sketch Challenge:

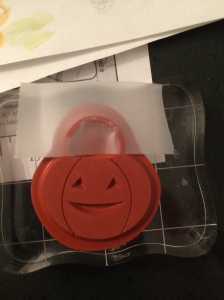
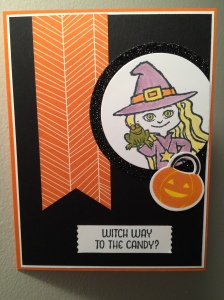
I knew I wanted to use that cute little witch.  I have fond memories of dressing up as a witch on multiple occasions, lol!  I used a blender pen to color the image, and circle framelits to cut out the black glimmer paper base (love it!!) and the image.  For the pumpkin, I masked off the handle using tape:

031

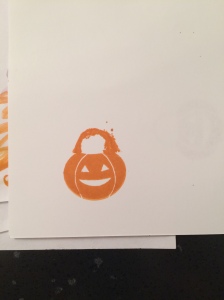
which works really well, unless you are not paying attention, and you forget to take the tape off before stamping:

030

oops, LOL!

Now, I have to confess that I used my old favorite, Pumpkin Pie, to stamp the image, even though I was using Tangelo Twist throughout the rest of the card.  Tangelo twist ink just made the pumpkin look too muddy to me.

I colored in the eyes, mouth and stripes to make them pop, and cut it out with my handy Boo to You framelits.  SO fun!!!  I am seriously like a kid in a candy store with all these fun holiday bundles!

I used the washi tape punch to cut out the sentiment, and the banner triple punch for the banner–makes those banners SO much easier!!

Here’s the finished card.  It was a lot of fun to make–now I’m really getting in the mood for FALL!!!

035


{{{hugs}}}

Sharon


Happy Halloween–and a rosette pumpkin!

Standard

We are having a cold, wet Halloween here in Georgia!  I confess that I really didn’t think we would get many kids, even though I had a huge bowl of candy at the door!  I’m happy to say that we had a fair number brave the elements, and most of the candy is gone!

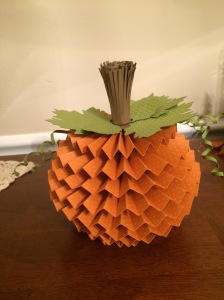
Charlie is watching the movie “Luther”, and I decided to make a rosette pumpkin.  I have wanted to make one forever!  I poked around Pinterest and found directions for one that only took 4 sheets of 12×12 paper, so I gathered my supplies and got started!

To make things easier, I scored all the cardstock before cutting it.  I used sticky strip to attach the pieces together and my glue gun for the rest.  I think it turned out really cute!

024

Here are the dimentions if you want to make one of your own:

Two strips of 2″ x 11″

Two strips of 2 1/2″ x 11″

Two strips of 2 3/4″ x 11″

Two strips of 3″ x 11″ plus one strip of 3″ x 4″

Two strips of 3″ x 11″ plus one strip of 3″ x 4″

Two strips of 2 3/4″ x 11″

Two strips of 2 1/2″ x 11″

Two strips of 2″ x 11″

Score all strips at 1/2″ intervals.

There are you tube videos showing how to assemble the pumpkin.

My stem was 2 strips of soft suede cut at 2 1/2″ x 11″.  I don’t have the fringe cut scissors, so I free hand cut the fringe, then trimmed the uncut edge down a bit.  If I make another pumpkin, I will trim the uncut side down even further–I think I’d prefer a short, chunky stem!

It was a fun way to pass the evening!

{{{hugs}}}

Sharon

Chevron Fall Card

Standard

While perusing Pinterest (one of my guilty pleasures!) I came across the coolest technique–how to fold strips of DSP into chevrons–and I couldn’t wait to try it out!  It’s no secret that this is my favorite time of year, and the cooler temperatures are making me reach for the fall themed stamps and papers!

030

Stamps:  Fall Fest, For All Things

Paper:  Very Vanilla, Cajun Craze, Old Olive, Color Me Autumn DSP

Ink:  Old Olive, Cajun Craze, Crushed Curry, Pumpkin Pie (pumpkin), Tangerine Tango (pumpkin)

Misc.:  Fun Fall Framelits, Labels Collection Framelits, Woodgrain Embossing Folder

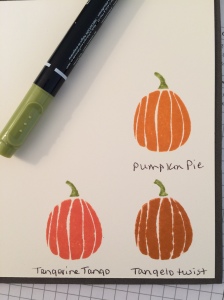
I had a discussion on Facebook about the new Tangelo Twist ink, since that was what was included in last month’s Paper Pumpkin kit.  I had not used the ink before, and one of my customers was not happy about how “muddy” it looked.  I was curious, so I tried it out–here it is compared to our other orange inks–it is definitely different!

028


If you want to make a paper chevron, here is a great tutorial:

http://stampandsewforfun.blogspot.com/2013/07/chevron-accent-trim.html

{{{hugs}}}

Sharon